Real estate photography tips: shoot, edit and label it right
Daylight, chest-height, straight lines, a smart shot order, and honest edits. Plus a real AI virtual staging example and when you must label it.
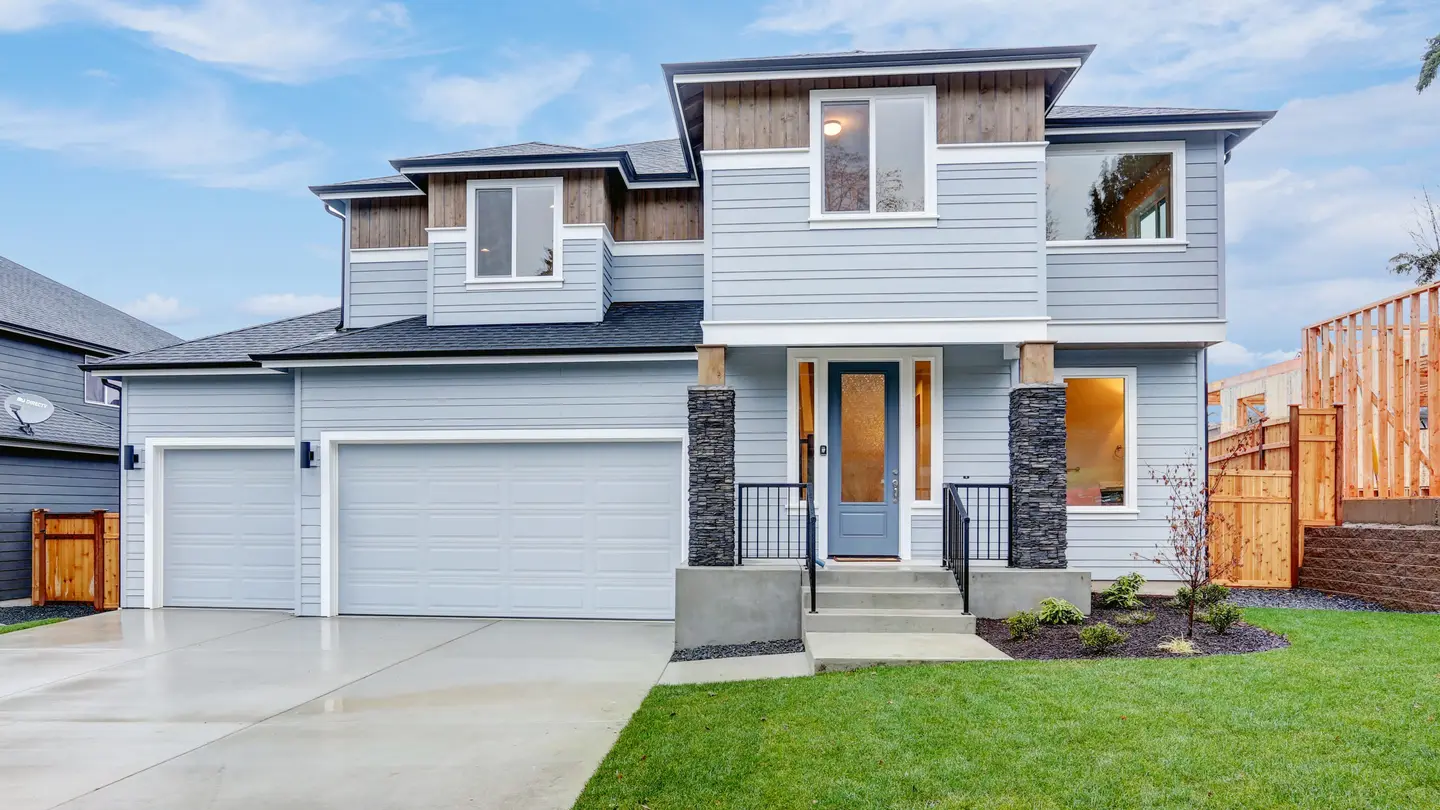
The real estate photography tips that matter most are simple: shoot in daylight with every light on, hold the camera at chest height with the verticals straight, and photograph a clean, empty-looking room from a corner. Then edit honestly: brighten and straighten freely, but label any photo that shows something that isn’t really there.
This guide covers the shoot (light, angles, shot order), the edits that are fine and the ones that need a “Virtually staged” label, the sizes listing sites want, and a real before and after we made with AI so you can see what virtual staging looks like and what it costs.
What are the best real estate photography tips for a better shoot?
Most listing photos fail for the same five reasons: they’re dark, tilted, cluttered, shot from too low or too high, or taken in the wrong order so the best room is photo 14. Fix those and a phone photo beats a careless camera photo.
- Shoot in daylight, every light on. Open every blind, switch on every lamp and ceiling light, and shoot when the sun isn’t pouring straight in the windows. Overcast days are easier than harsh sun.
- Clear the room first. Put away fridge magnets, toiletries, cords, pet bowls, trash bins and anything with a name or photo on it. Buyers should see the room, not your Tuesday.
- Camera at chest height, about 4 to 5 feet. Lower makes furniture loom; higher shows too much floor. Keep the phone or camera level so door frames and walls stay straight up and down.
- Shoot from a corner or a doorway. A corner shows three walls and the size of the room. Use your phone’s 0.5× lens or a wide lens, but not so wide that the room looks bigger than it is.
- Take more than you need. Three or four angles per room, then keep the best one or two.
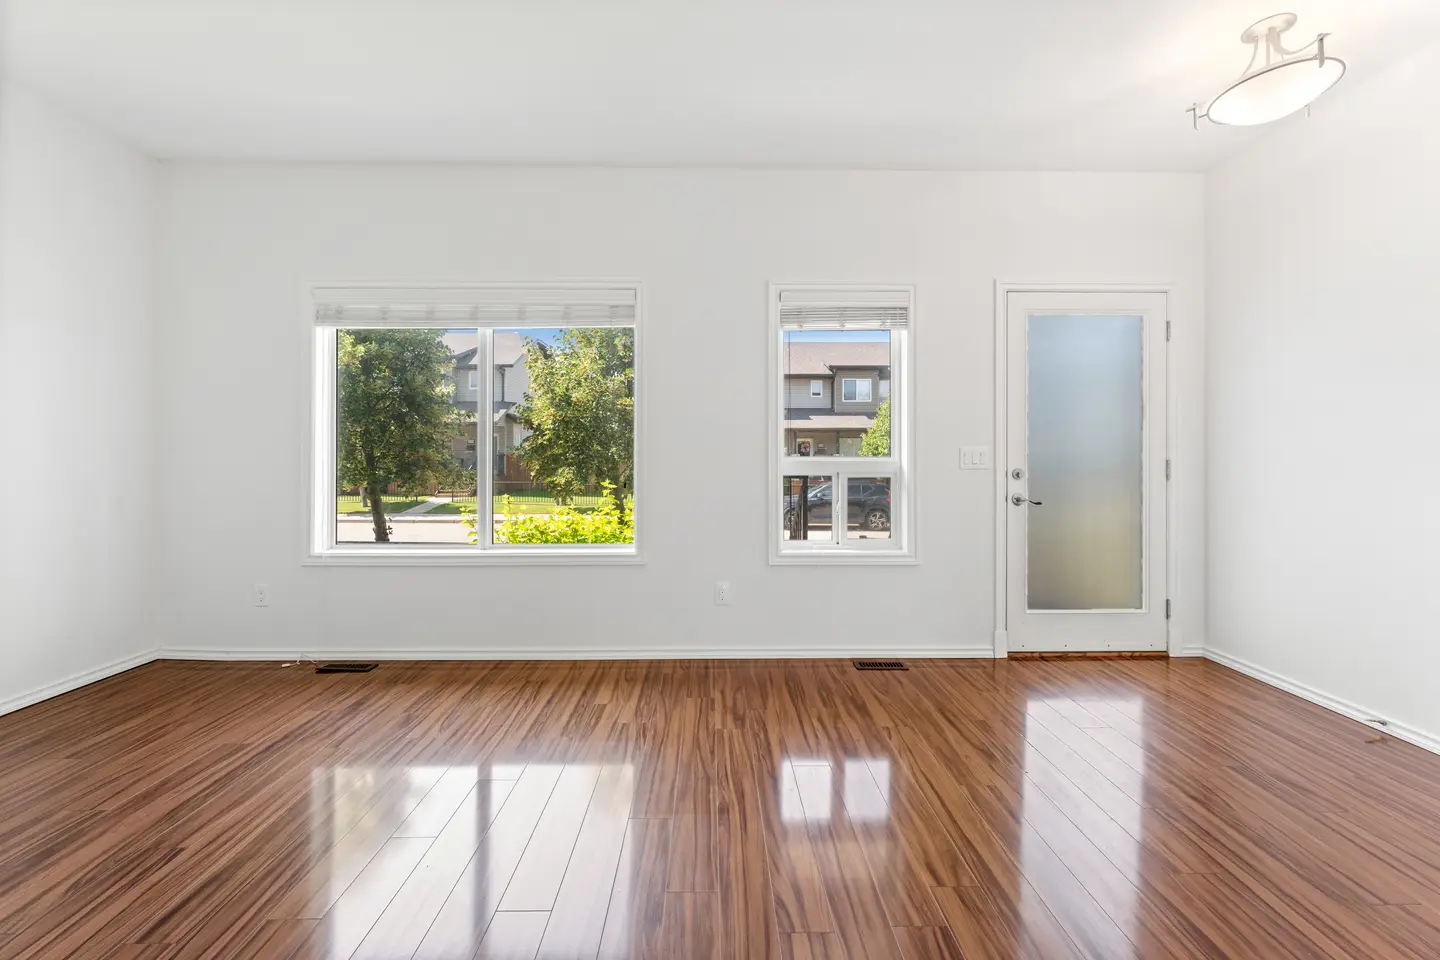
Look at the empty room photo below: windows square to the frame, the door frame perfectly vertical, every light source used. That’s what “level and straight” looks like.
Which photos should a listing include, and in what order?
Lead with the photo that makes someone click, then walk the buyer through the home the way they’d tour it. A shot list keeps you from forgetting a room.
| Order | Shot | Why |
|---|---|---|
| 1 | Front exterior, straight on or at a slight angle | The thumbnail in every search result |
| 2–4 | Living room, kitchen (2 angles) | The rooms buyers ask about first |
| 5–6 | Dining area, family room | Shows how the home lives |
| 7–9 | Primary bedroom, primary bath | The next most-searched rooms |
| 10–14 | Other bedrooms and baths | One good angle each |
| 15–18 | Yard, patio, garage, storage | The space people underestimate |
| 19+ | Street, nearby park or view | Context, never instead of the home |
A note on that last row: a nearby park or skyline shot must be the real place. Never use a stock photo or an AI image to stand in for the property or its view. Stock and AI images are fine for your marketing around the listing (an “Open house this Saturday” post, a mailer background, a blog header), not as pictures of the home for sale.
Can you edit real estate photos, and when do you have to disclose it?
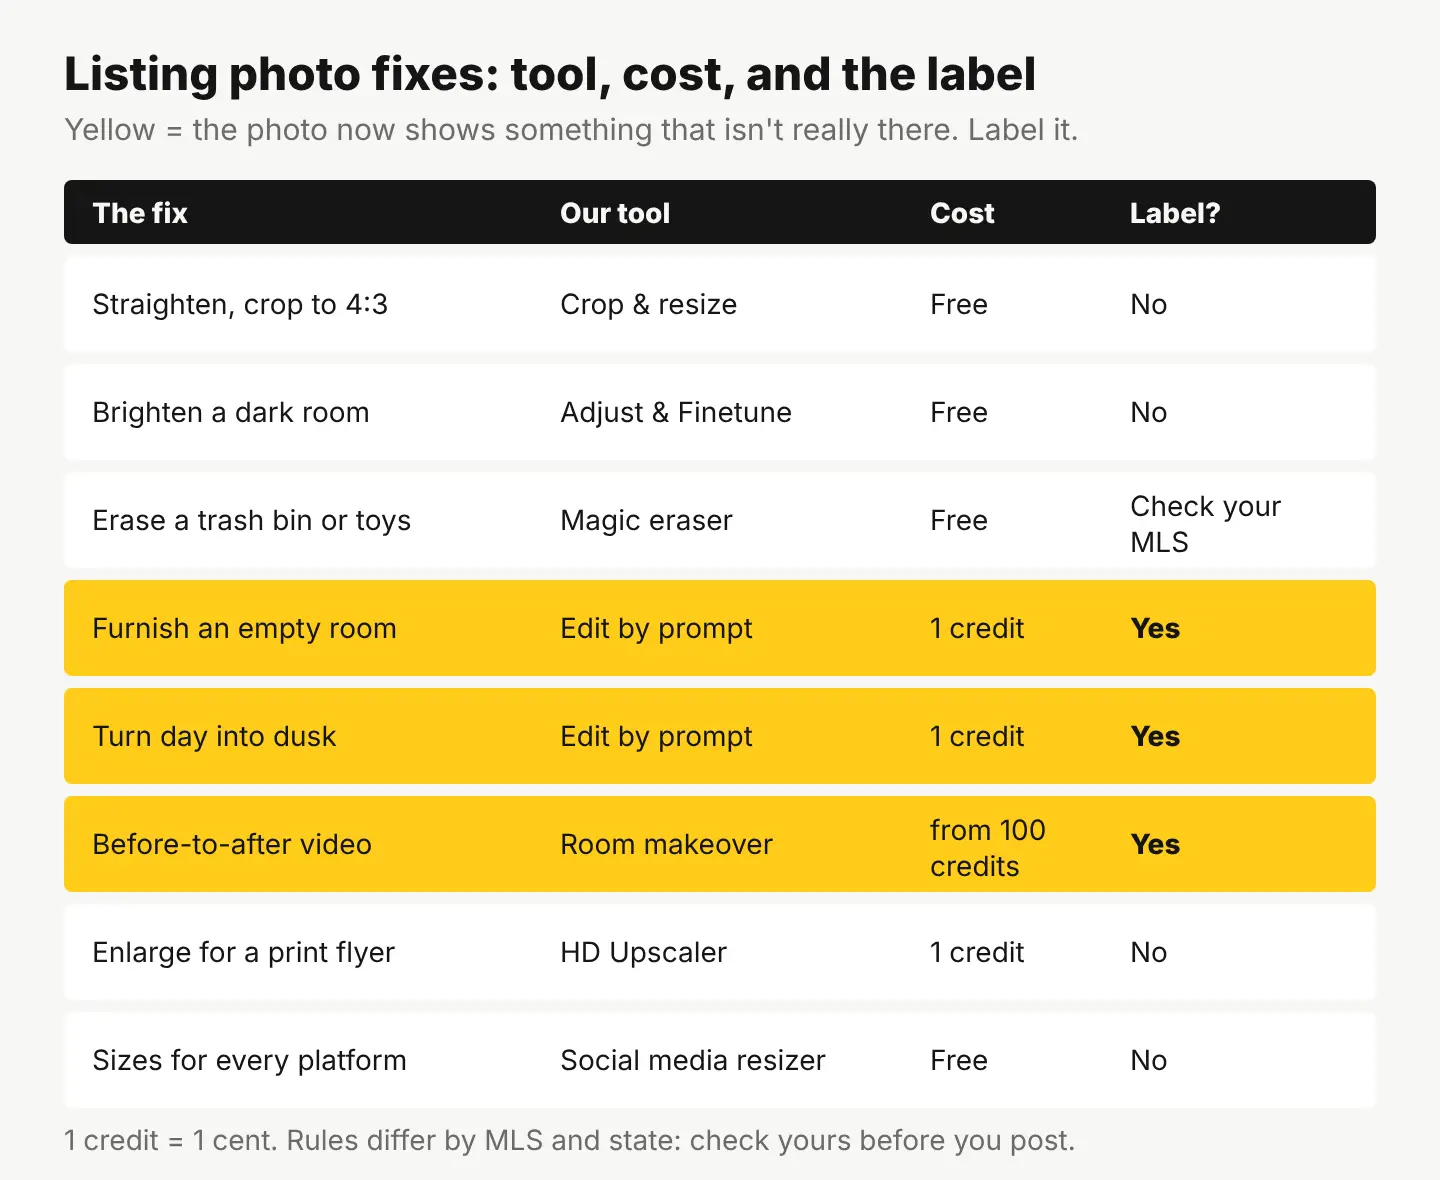
Yes, you can edit them, and most good listing photos are edited. The line is simple: editing that makes the photo look like the room did on a good day is fine; editing that changes what’s in the room needs a label.
Rules here are tightening. California’s AB 723 requires real estate ads that use a digitally altered image to say so and to give access to the original, and many MLSs now require an on-photo label such as “Virtually staged.” NorthstarMLS’s guidelines are a good example of where most MLSs draw the line: adding furniture is allowed with disclosure; hiding defects or changing the property itself isn’t.
Here’s how each common fix maps to our tools, what it costs, and whether it needs a label:
What never belongs in a listing photo, label or not:
- Removing power lines, a cell tower, cracks, water stains or a neighbor’s building.
- Replacing a gray lawn with a green one, or adding a pool, a fireplace or a view.
- Changing permanent finishes (floors, counters, cabinets, wall color) without saying it’s a rendering.
How do you virtually stage a room with AI?
Virtual staging means adding furniture to a photo of an empty room so buyers can picture the space. With Edit by prompt in our free photo editor, you describe the furniture in a sentence and the AI adds it for 1 credit (1 cent). Here’s the empty room above, staged with this exact prompt:
Virtually stage this empty living room. Add a light gray three-seat sofa against the left wall facing the windows, a round oak coffee table, a cream wool rug under them, a slim floor lamp and one large leafy plant in a pot near the door. Keep the walls, windows, door, glossy wood floor, ceiling light, the view outside and the camera angle exactly as they are.
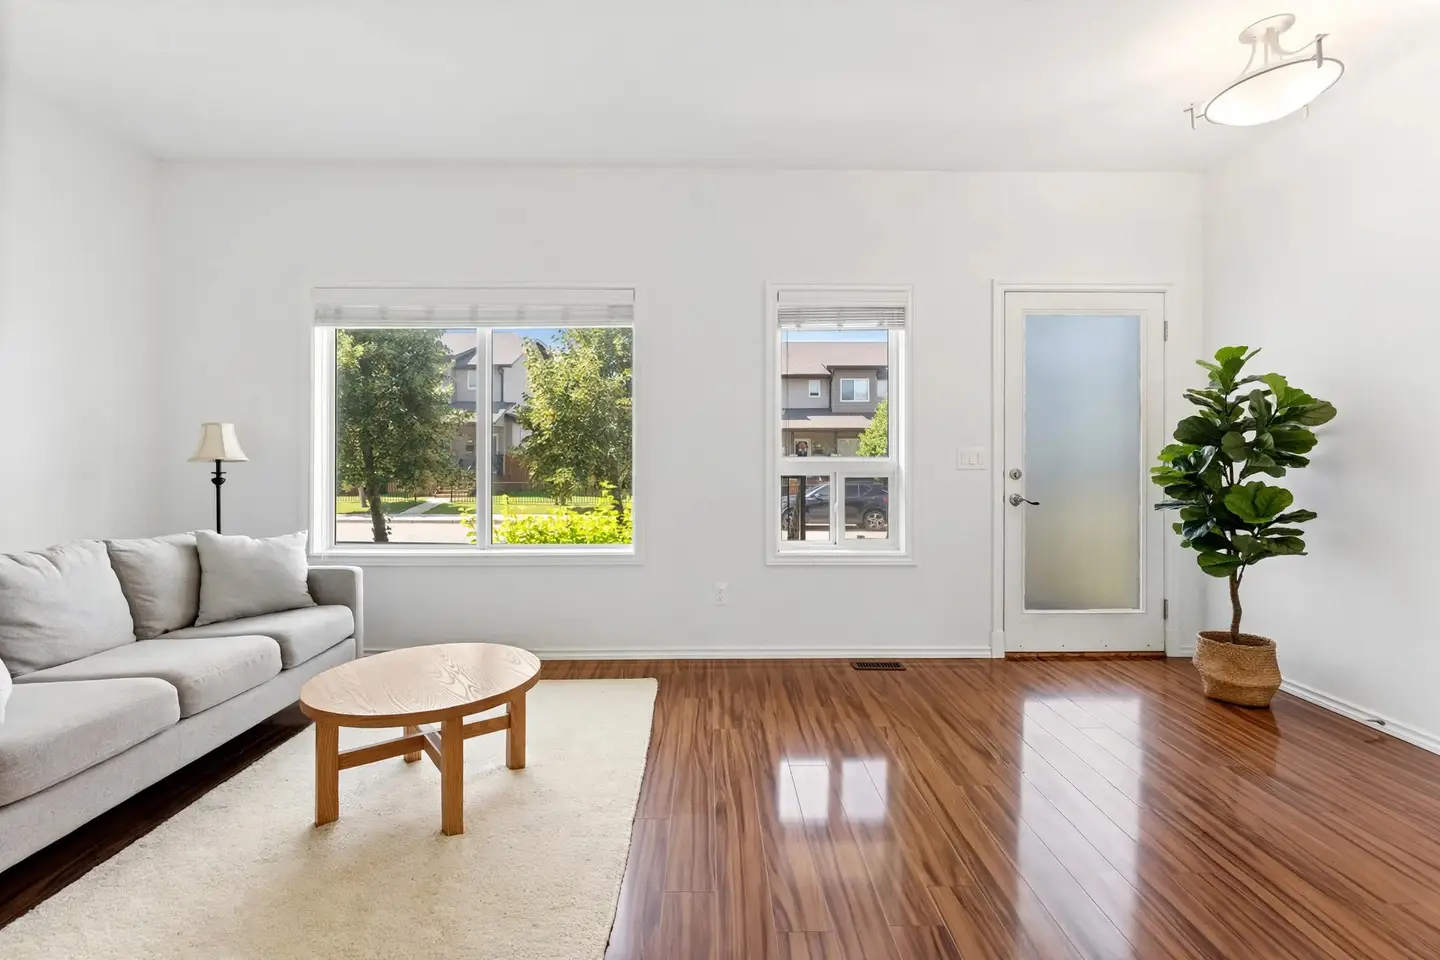
What to notice:
- The prompt names what stays. Walls, windows, door, floor, ceiling light and camera angle all came through unchanged. Without that last sentence, AI edits tend to “improve” things you didn’t ask for.
- The AI took small liberties. We asked for a round table and got an oval one, and the rug covers one floor vent. That’s fine for staging, but check every edit: if it moved a window or changed the floor, it’s no longer the same room.
- It’s still a demo photo. We used a licensed stock photo to show the technique. For a listing, you’d stage your own photo of the actual room, keep the original, and post both if your MLS asks.
Then add the label. In the editor, the Text tool puts “Virtually staged” in a corner of the photo with a color box behind it so it stays readable. For a dark exterior, the same prompt approach turns a daytime shot into dusk (“make it early evening with warm lights in every window; keep the house, lawn and driveway exactly as they are”). That’s also an alteration, so label it too.
If you want motion, our room makeover video turns one listing photo into a before-to-after clip (staged, renovated, or day to dusk), from 100 credits. Same rule: say it’s a visualization.
What size should real estate photos be?
Shoot landscape and export at least 2048 × 1536 pixels (4:3) as a JPEG. That’s the size most MLS photo guides recommend, and it leaves room to crop. Zillow’s own listing feed requirements set a much lower floor (330 × 220 pixels, files up to 5 MB), but a photo that small looks blurry on today’s screens. Your MLS sets the real limits, so check its rules for maximum file size and count.
For the same photos elsewhere:
- Social posts: our free social media resizer exports one image for Instagram, Facebook, X, LinkedIn, Pinterest, YouTube and TikTok in one zip, so the kitchen isn’t cut in half on a square post.
- Print flyers and window cards: a phone photo enlarged for print can go soft. The HD Upscaler makes it up to 4× bigger, to 4K, for 1 credit; Quick Upscale 2× in the editor is free.
- Website and email: crop to the frame the template uses with Crop & resize before you upload, so the template doesn’t crop the front door off.
If you’ve ever wondered how changing a sky or backdrop works under the hood, our guide to changing a photo’s background walks through three ways side by side.
Your next step
Before your next shoot, print the shot list above and walk the home in that order. Afterward, open the editor, straighten and brighten everything for free, and if one empty room needs help, stage it with Edit by prompt for a cent and add the “Virtually staged” label before it goes anywhere near the MLS. A free account comes with 20 credits on sign-up, no card, and 3 more every day, so staging a few rooms costs nothing to try.
Questions people ask
- Can I take real estate photos with my phone?
- Yes. A recent phone with a 0.5× wide lens, held level at chest height in good daylight, gives listing-ready photos. A tripod helps keep every shot straight and at the same height.
- What time of day is best for real estate photos?
- Interiors look best in bright, indirect daylight, often mid-morning or on a light overcast day. For the front exterior, shoot when the sun lights the front of the house rather than from behind it.
- Can I use stock photos in a property listing?
- Not to show the property or its view: listing photos must be the real home. Stock photos work for marketing around it, like an open house post, a mailer background or a neighborhood guide.
- Is virtual staging legal?
- Generally yes, when it's disclosed. Most MLSs and some states, including California, require a label such as "Virtually staged" and access to the original photo. Check your MLS rules first.
Keep reading
 By industryRestaurant menu with photos: which dishes to show, and sizesShow 3 to 5 dishes, not all of them, and always your own food. Which plates deserve a photo, where stock and AI fit, and every size you need.
 By industryWhat photos does a café or bakery need? Shot list and sizesYour own photos for the menu and the shop, stock or AI images only for mood and backgrounds. The full shot list, sizes, and a month of images for 62 credits.
 By industryWhat photos does an Etsy listing need? A shot-by-shot planThe real item first, then details, scale, options and packaging, at 2000 px or more. The full shot list, Etsy's crop trap, and free tools to make each photo.