How to upscale an image: free 2× or 4K, step by step
Check the pixels you need, crop, then upscale 2× free or up to 4× and 4K for a cent. The pixel math for prints and screens, and what upscaling can't fix.
To upscale an image, work out how many pixels you actually need, crop first, then run the image through an AI upscaler at 2× or 4× and check faces, edges and text at 100% zoom before you export. Plain resizing just stretches pixels and looks soft; an AI upscaler adds believable detail as it enlarges, which is why it holds up far better on prints and big screens.
This guide covers how to tell whether you need to upscale at all, the pixel math for common prints and screens, both ways to do it with our tools (one free, one for a cent), and the things no upscaler can fix.
Do you even need to upscale your image?
Often you don’t. Upscaling only helps when the place the image is going needs more pixels than you have. So check two numbers first: your image’s size, and the size the destination wants.
To see your image’s size: on Windows, right-click the file, choose Properties, then the Details tab, and look at Dimensions. On a Mac, select the file in Finder, choose Get Info, and look under More Info.
Then compare it with where it’s going:
- Instagram: photos wider than 1080 pixels are shrunk to 1080, and photos narrower than 320 are enlarged to 320 (Instagram Help Center). An image that’s already 1080 wide gains nothing from an upscale here.
- Prints: a common rule of thumb is 300 pixels per inch for prints you hold in your hand, and less for wall prints seen from across the room (Nations Photo Lab’s resolution guide). Multiply each side in inches by 300 to get the pixels you need.
- Screens and slides: a 4K screen is 3840 × 2160 pixels. A full-screen image on a 4K TV or projector needs about that much.
If you’re short, upscale. If you’re already over, don’t: you’ll only make a bigger file that gets shrunk again.
How many pixels do you need?
Here’s the math worked out for the sizes people ask about most, at 300 pixels per inch:
| Where it’s going | Pixels you need | Enough from an 800 × 600 photo? |
|---|---|---|
| Instagram feed post | 1080 wide | After 2× (1600 wide), yes |
| 4 × 6 in print | 1200 × 1800 | After 2× (1600 × 1200), close; after 4×, yes |
| 5 × 7 in print | 1500 × 2100 | After 4× (3200 × 2400), yes |
| 8 × 10 in print | 2400 × 3000 | After 4× (3200 × 2400), yes, in landscape |
| Full screen on a 4K display | 3840 × 2160 | After 4×, close (3200 × 2400) |
The 800 × 600 example isn’t random: it’s a typical size for a photo saved from an old phone, a website or a chat app, which often shrink images when you send them.
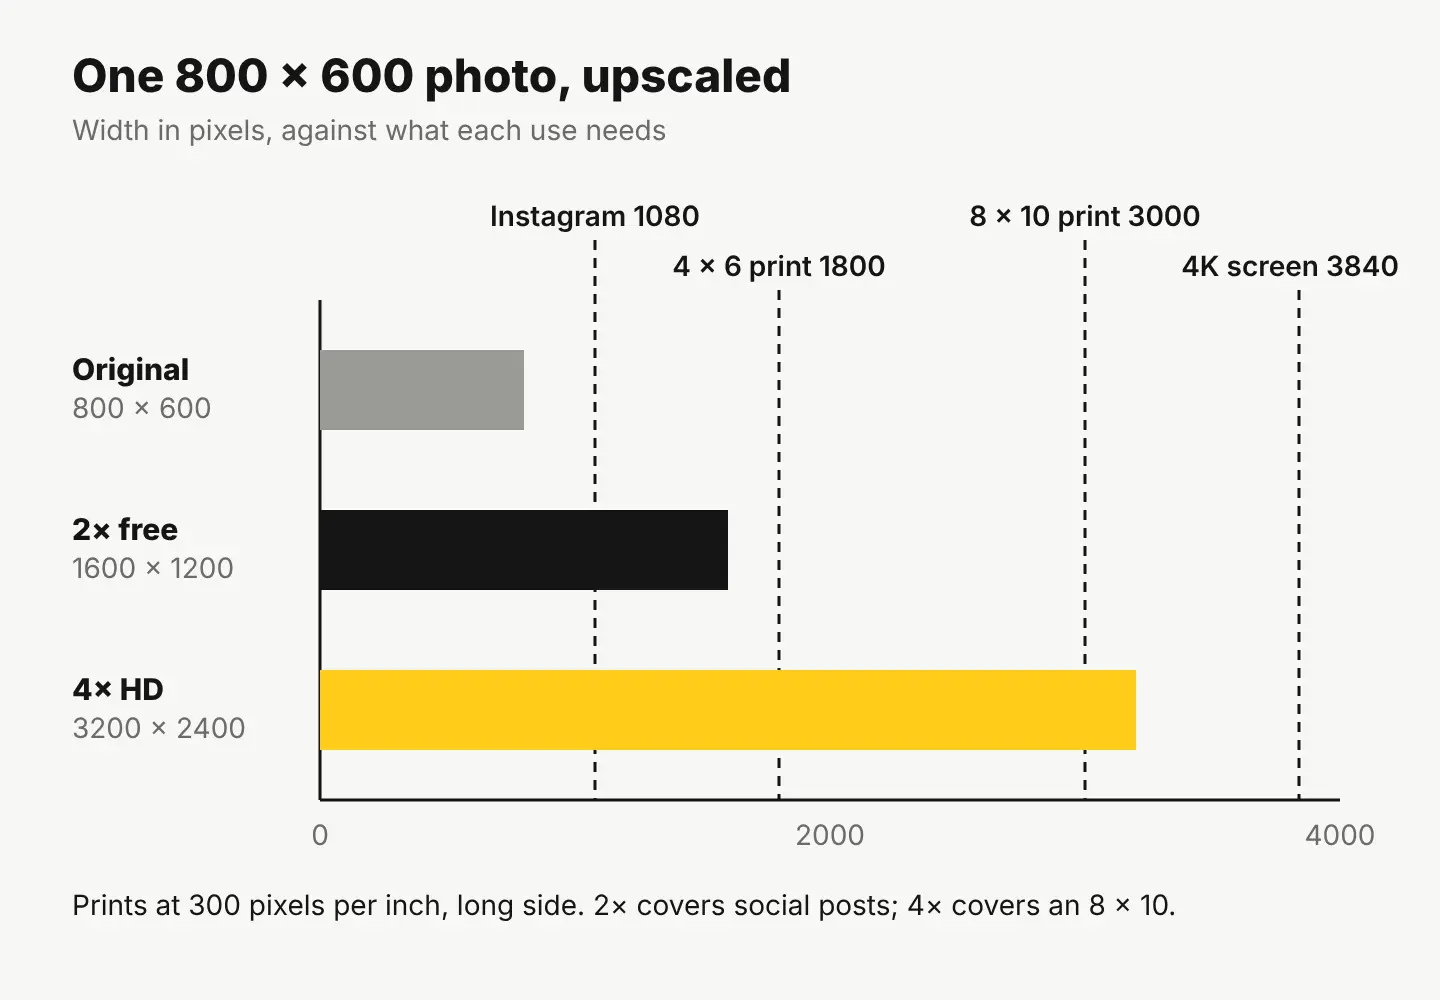
A quick way to remember it: 2× is enough for social posts and small prints; 4× is for 8 × 10 prints, posters and big screens.
How to upscale an image for free (Quick Upscale 2×)
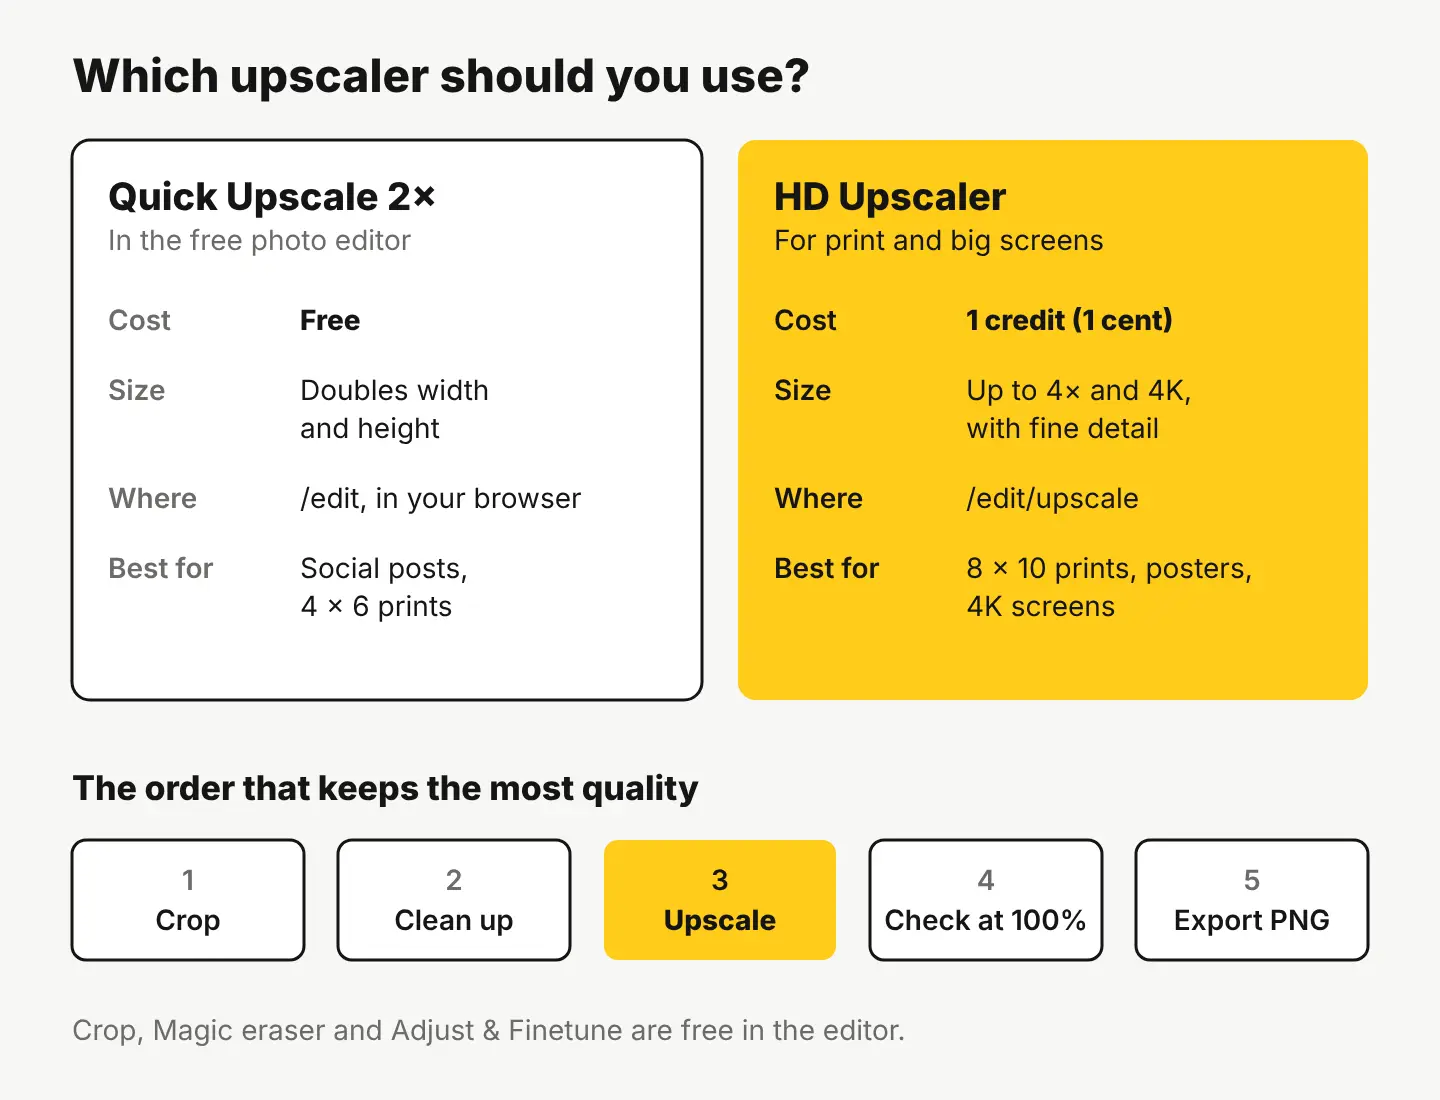
If you need double the size, our free photo editor does it in your browser, with no watermark.
- Open the editor and add your image (JPG, PNG, WebP, GIF or BMP).
- Crop first with Crop & resize if you plan to crop at all. Cropping after upscaling throws away pixels you just made.
- Run Quick Upscale 2×. It doubles the width and height, so an 800 × 600 image becomes 1600 × 1200.
- Zoom to 100% and look at the edges, hair, fabric and any text.
- Export with Resize & export: PNG for print, JPEG or WebP for the web.
The editor doesn’t upload your photo until you save, so this works fine for private pictures too.
How to upscale an image to 4× or 4K (HD Upscaler)
When 2× isn’t enough, or you want the cleanest detail for print, use the HD Upscaler. It enlarges up to 4× and up to 4K with fine detail, and costs 1 credit (1 cent) an image.
- Prepare the image in the editor first: crop, remove any distracting objects with Magic eraser, fix the light with Adjust & Finetune. Each of these is free.
- Open the HD Upscaler and add the image.
- Choose how much bigger you need, based on the table above. Don’t go to 4× out of habit: if 2× covers your print, the file stays smaller and easier to send.
- Check the result at 100%, especially faces, eyes and any lettering (more on why below).
- Save a PNG for the print shop, and keep your original next to it.
What does it cost? Upscaling a 30-photo album with the HD Upscaler is 30 credits. New accounts get 50 free credits with no card, then 3 free credits every day, so a first batch like that costs nothing. Quick Upscale 2× is always free. See pricing for plans, starting at $4.99 for 500 credits a month.
How do you upscale an image without losing quality?
No upscaler can add back detail that was never captured. An AI upscaler makes an educated guess about what the missing detail looked like, and on most photos the guess is very good. These habits keep it that way:
- Start from the best copy you have. The original file from the camera or phone beats a screenshot, and a screenshot beats a copy sent through a chat app.
- Crop before you upscale, never after.
- Upscale once, by the amount you need. Running an image through 2× twice usually looks worse than one 4×.
- Remove backgrounds after upscaling. Cutouts from a small image get chunky edges; our guide on removing a white background covers this step.
- Export as PNG for anything going to print, so you don’t add compression on top of the enlargement.
What can’t upscaling fix?
Being honest about this saves you a reprint:
| Problem | What upscaling does | What to do instead |
|---|---|---|
| Motion blur or missed focus | Makes the blur bigger and sharper-edged, but still blurry | Find a sharper shot, or print smaller |
| Heavy compression blocks | Smooths some, but can turn them into odd textures | Track down an earlier, larger copy |
| Tiny faces in a group shot | Can invent eyes or teeth that don’t match the person | Check every face at 100%; print smaller if they look wrong |
| Small text and logos | Can turn letters into near-letters | Retype text in the editor with Text rather than relying on the upscale |
| Old, scratched prints | Enlarges the scratches too | Repair first with Photo restoration (2 credits), then upscale |
That last one is a common combination: our guide to restoring old photos walks through the repair, and the upscale comes after.
Upscaling a stock photo? That’s fine. Editing doesn’t change the license, and the legal protection covers the original photo. Images you make with our AI generator can be upscaled and used commercially too, but AI images don’t come with legal protection.
Your next step
Find the one image you’ve been putting off printing because it looked too small. Check its dimensions, look up the size you need in the table above, and run it through Quick Upscale 2× in the free editor. If it still falls short, the HD Upscaler takes it to 4× for 1 credit. Print a 4 × 6 test first, and order the big print once you’re happy with it.
Questions people ask
- Is it better to upscale a photo or just print it smaller?
- If the photo is sharp, upscaling to the size you need usually prints well. If it's blurry or heavily compressed, printing smaller will look better than any upscale.
- Can I upscale a screenshot?
- Yes, but screenshots are often already shrunk and compressed, so find the original file if you can. Screenshots of text upscale poorly; retype the text instead.
- Does upscaling change the file size?
- Yes. Doubling the width and height means four times the pixels, and 4× means sixteen times, so the file gets much bigger. Export JPEG or WebP for the web to keep it small.
- Can I upscale an AI image I made with Create?
- Yes. Run it through Quick Upscale 2× in the editor for free, or the HD Upscaler for 1 credit. AI images can be used commercially, but they don't come with legal protection.
Keep reading
 Photo editingHow to resize an image for Instagram without croppingMost photos fit Instagram whole: export them 1080 px wide at their own shape. Exact sizes, what each crop cuts, and fixes for shapes that don't fit.
 Photo editingHow to restore old photos: scan, repair and colorizeScan the print, let AI repair scratches, cracks and fading, then touch up by hand. Step by step, with scanning tips and real costs: 2 cents a photo.
 Photo editingHow to change the background of a photo: 3 ways comparedCut it out for free, blend it into a real scene, or describe a new one with AI. A real before and after, costs side by side, and iPhone tips.